Polling, Long Polling, SSE(Server Sent Event)
HTTP/1.1 200Content-Type: text/event-stream;charset=UTF-8Transfer-Encoding: chunked HTTP의 이해HTTP란?클라이언트와 서버가 서로 데이터를 주고받기 위해 사용되는 통신 규약으로 다음과 같은 데이터 타입을 전송
hbb-devlog.tistory.com
저번에는 SSE가 무엇인지 간단히 살펴보았는데, 이번에는 SSE를 간단히 구현해보도록 하겠다.
1. 클라이언트는 구독을 위한 요청 전송
클라이언트는 EventSource를 통해 SSE 연결 요청
const eventSource = new EventSource('<http://localhost:8080/subscribe>');
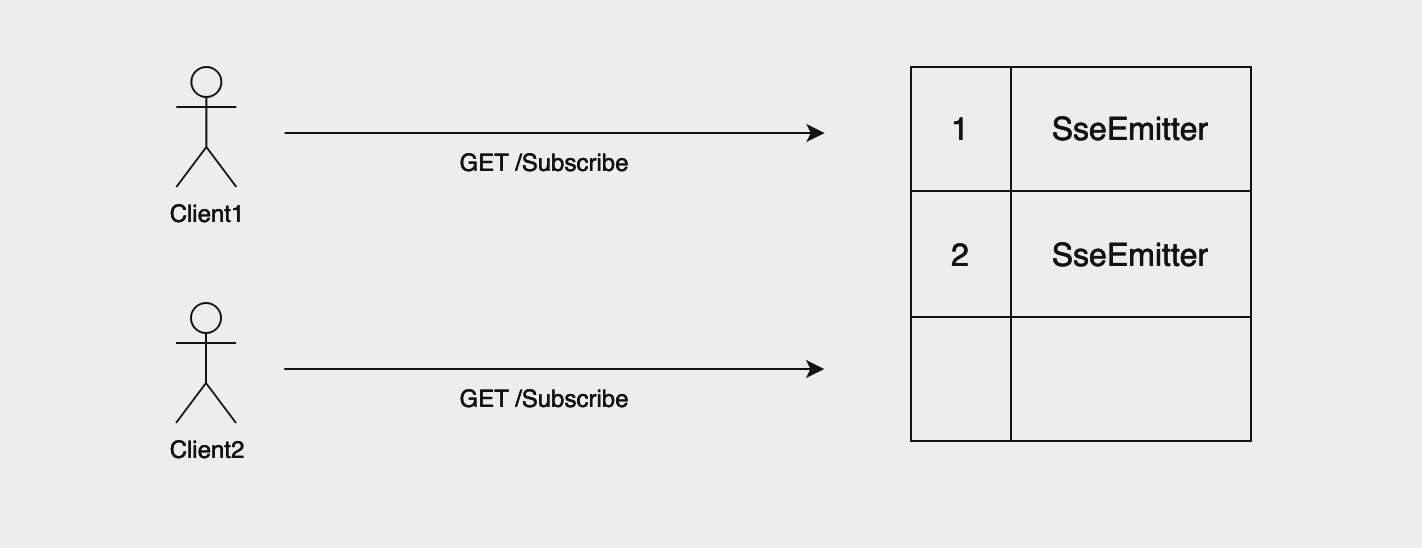
2. 서버는 구독 요청에 대해 응답을 전송
스프링은 SSE를 편하게 구현할 수 있도록 SseEmitter API를 지원한다.
- SSE 객체를 관리하기 위한 Repository 생성
- 이 때 emitters 필드는 여러 스레드에서 접근할 수 있으므로 thread-safe한 동시성 컬렉션을 사용
- Key: 클라이언트 ID (Long), Value: 해당 클라이언트와의 SSE 연결을 관리하는 SseEmitter 객체
@Repository
public class EmitterRepository {

    private final Map<Long, SseEmitter> emitters = new ConcurrentHashMap<>();

    public SseEmitter save(Long emitterId, SseEmitter sseEmitter) {
        emitters.put(emitterId, sseEmitter);
        return sseEmitter;
    }

    public void deleteById(Long emitterId) {
        emitters.remove(emitterId);
    }

    public Optional<SseEmitter> get(Long emitterId) {
        return Optional.ofNullable(emitters.get(emitterId));
    }
}
- Service 계층 구현
- ‘subscribe’이라는 이름으로 이벤트를 전송
- 클라이언트는 서버에서 정한 이벤트 이름으로 수신받을 수 있다.
eventSource.addEventListener('subscribe', (e) => { const { data: received } = e; }); - 여기서 sseEmitter 객체를 생성 후 만료 시간까지 아무 데이터도 보내지 않는다면 재연결 요청 시 503 Service Unavailable 에러가 발생할 수 있으므로 구독 요청을 성공적으로 받았다는 더미 데이터 응답을 전송한다.
- ‘subscribe’이라는 이름으로 이벤트를 전송
@Service
@RequiredArgsConstructor
public class NotificationService {
	private final EmitterRepository emitterRepository;
	private static final Long DEFAULT_TIMEOUT = 60L * 1000 * 60; // 1시간, 만료되면 브라우저에서 서버로 재연결 요청 전송
	private static final String SUBSCRIBE_NAME = "subscribe";

	public SseEmitter subscribe(Long memberId) {
		SseEmitter sseEmitter = new SseEmitter(DEFAULT_TIMEOUT);
		emitterRepository.save(memberId, sseEmitter);
		sseEmitter.onCompletion(() -> emitterRepository.deleteById(memberId));
		sseEmitter.onTimeout(() -> emitterRepository.deleteById(memberId));

		try {
			// 503 에러를 방지하기 위한 더미 데이터 전송
			sseEmitter.send(SseEmitter.event().name(SUBSCRIBE_NAME).data("subscribe completed"));
		} catch (IOException e) {
			emitterRepository.deleteById(memberId);
			throw new NotificationHandler(ErrorStatus.NOTIFICATION_CONNECT_ERROR);
		}
		return sseEmitter;
	}
}
- 컨트롤러 구현
@RestController
@RequiredArgsConstructor
public class NotificationController {

    private final NotificationService notificationService;

    @GetMapping(value = "/subscribe", produces = MediaType.TEXT_EVENT_STREAM_VALUE)
    public SseEmitter subscribe(@LoginMember SessionMember member) {
        return notificationService.subscribe(member.getId());
    }
}
이렇게 클라이언트의 구독 요청이 완료되면 아래와 같이 된다.
3. 구독을 성공적으로 마치게 되면 서버에서 클라이언트로 단방향 데이터 전송이 가능하며 데이터 변경이 일어날 때 마다 응답 전송
- 기존 컨트롤러에 알림 기능 추가
@GetMapping("/notification")
public ApiResponse<List<NotificationResponse.NotificationResponseDto>> alarm(@LoginMember SessionMember sessionMember) {
	return ApiResponse.onSuccess(notificationService.send(sessionMember.getId()));
}
- 서비스 구현
@Slf4j
@RequiredArgsConstructor
@Service
@Transactional(readOnly = true)
public class NotificationService {

    private static final Long DEFAULT_TIMEOUT = 60L * 1000 * 60; // 1시간
    private static final String NOTIFICATION_NAME = "notification";
    private static final String CONNECT = "connect";
    private final NotificationRepository notificationRepository;
    private final EmitterRepository emitterRepository;

    public SseEmitter subscribe(Long memberId) {
        SseEmitter sseEmitter = new SseEmitter(DEFAULT_TIMEOUT);
        emitterRepository.save(memberId, sseEmitter);
        sseEmitter.onCompletion(() -> emitterRepository.deleteById(memberId));
        sseEmitter.onTimeout(() -> emitterRepository.deleteById(memberId));

        try {
            sseEmitter.send(SseEmitter.event().name(CONNECT).data("connect completed"));
        } catch (IOException e) {
            emitterRepository.deleteById(memberId);
            throw new NotificationHandler(ErrorStatus.NOTIFICATION_CONNECT_ERROR);
        }

        return sseEmitter;
    }

    public void send(Long memberId) {
		    .. 알림 보낼 대상 조회 로직
		    .. 알림 생성 로직
        emitterRepository.get(targetMember.getId())
                .ifPresentOrElse(sseEmitter -> {
                    try {
                        sseEmitter.send(SseEmitter.event()
                                .name(NOTIFICATION_NAME)
                                .data(response));
                    } catch (IOException e) {
                        emitterRepository.deleteById(member.getId());
                        throw new NotificationHandler(ErrorStatus.NOTIFICATION_CONNECT_ERROR);
                    }
                }, () -> log.info("No emitter founded"));
    }
}
이렇게 send를 호출하여 수신자의 emiiter로 알림을 전송하면 Map에 있는 SseEmitter 객체를 보고 구독한 클라이언트에게 이벤트를 전송한다.
클라이언트는 ‘notification’ 이름의 이벤트를 아래와 같이 받을 수 있다.
eventSource.addEventListener('notification', (e) => {
	const { data: received } = e;
});
주의
1. 위 예제에서는 SseEmitter를 메모리에서 관리한다.
- (private final Map<Long, SseEmitter> emitters = new ConcurrentHashMap<>())
- 로드 밸런싱을 이용하여 서버 인스턴스가 여러 개인 경우 제대로 동작하지 않으므로 이 때는 메시지 브로커를 활용해야 한다.
2. nginx 웹 서버로 리버스 프록시를 사용한다면 nginx는 HTTP 1.0이 기본이므로 Persistent Connection이 적용되지 않는다.
- 따라서 아래 설정이 필요하다.
proxy_set_header Connection '';
proxy_http_version 1.1;
또한 nginx는 기본적으로 버퍼에 응답을 저장해두었다가 버퍼가 가득 차거나, 서버가 응답을 모두 보낼 때 클라이언트로 전송하는 버퍼링 기능을 지원한다.
이는 실시간 통신에 문제가 발생할 수 있으므로 SSE 응답 API 헤더에 X-Accel-Buffering: no 설정으로 SSE 응답만 버퍼링을 하지 않도록 한다.
response.setHeader("X-Accel-Buffering", "no");
3. SSE는 HTTP 1.1 Persistent Connection으로 커넥션을 계속 사용한다.
- OSIV가 true라면 API 응답이 완료될 때 까지 데이터베이스 커넥션을 유지하는데, SSE는 장시간 연결하므로 DB Connection이 고갈될 수 있으므로 OSIV 설정을 false로 해야한다.
'Spring' 카테고리의 다른 글
| [Spring] WebSocket & STOMP 채팅 기능 구현하기 (1) (0) | 2025.02.25 |
|---|---|
| [Spring] 스프링에서 직렬화, 역직렬화 (0) | 2025.01.25 |
| [Spring] API 및 예외 응답 통일 (0) | 2025.01.11 |
| [Spring] OAuth2.0을 이용한 네이버, 구글 소셜 로그인 구현 (0) | 2025.01.02 |
| [Spring] 외부 설정, @Profile (0) | 2024.12.28 |